Table of contents
- Example active heading
- Example heading


Before we teach you how to set up Google Ads, let’s familiarize you with a few common terms you will find during this process.
Keywords - These are the words or phrases that people type into Google Search, which trigger your ad to appear. During ad campaign setup, you select keywords matching what users may search for.
Bid - It represents the maximum amount you're willing to pay when someone clicks on your ad. Google Ads only charges for actual clicks, not ad impressions.
Quality Score - It measures the relevance and usefulness of your ad and landing page compared to other advertisers. A higher Quality Score indicates greater relevance to user searches.
CPC (cost-per-click) - It's the actual amount you pay when someone clicks your ad. Your bid sets the maximum cost, but you may pay less for each click.
Conversion - It occurs when a user who clicks your ad completes a desired action, like making a purchase or signing up.
Running successful online advertising campaigns is crucial in today's digital marketing landscape, and Google Ads provides a powerful platform to connect with potential customers at the right moment. Whether you're new to online advertising or an experienced marketer, this guide will equip you with the knowledge and strategies needed to run effective Google Ads campaigns. Now, let's learn how to create ads on Google and increase the potential of your business.
The first step to set up Google Ads will be to create a Google Ads account. You can do it by going to ads.google.com and clicking on the “Start Now” button.

After clicking on the button, you will start the process to set up your Google Ads account, where you will need to provide Google with your business name and your business website.

After completing those two steps, you will be taken to this page where you will select your advertising goal. As you can see, Google tries to simplify your onboarding process by offering four options. Although these options can work well, Google also offers the “Expert Mode” option, where you will have access to different settings that will help you optimize your campaign to take it to the next level. We want to teach you the best way to succeed with Google Ads, so we will be using “Expert Mode” for this guide.

Now it’s time to choose a campaign objective. Google Ads provides you with a range of campaign types to suit different advertising goals and target audiences. The campaign types available in Google Ads include Search, Display, Video, Shopping, App, Discovery, and Local campaigns.
After reading through the descriptions of each objective, you can pick one that fits the goals you have for your business. If you are not sure which campaign objective to select, don’t worry. You can also select the “Create a campaign without a goal's guidance” option, which we are going to use for this guide.

After selecting the campaign objective, you will now be able to choose your campaign type. Google Ads offers many different campaign types, including Search, Performance Max, Display, Video, App, Smart, Discovery, and Shopping.
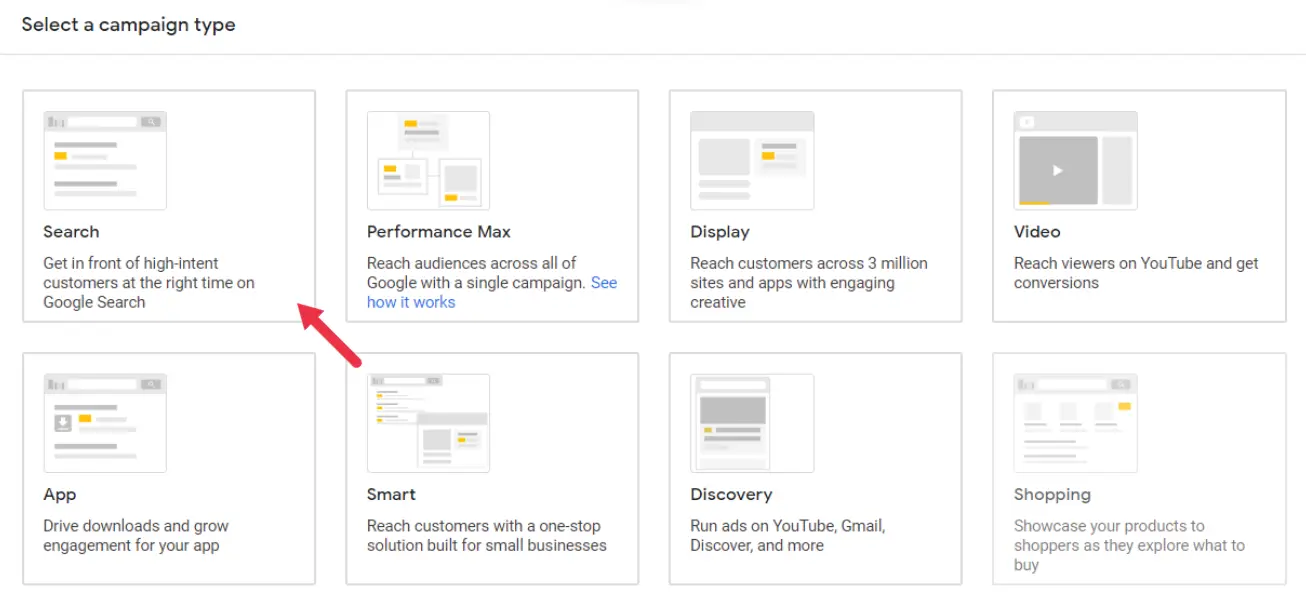
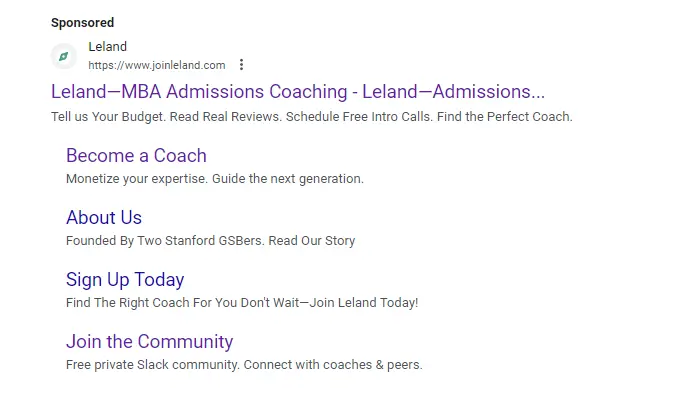
Each type serves different objectives and audience targeting strategies, allowing advertisers to effectively reach their goals. In this guide, we will be selecting the “Search” type, which is used to create the ads you often see when performing a search on Google. Here is an example of how they look:
After selecting “Search” for our campaign type, Google will want to know what results we are expecting from that campaign. We will choose “Website Visits” for this guide, and then type in the business website one more time.

The first thing you will do in your campaign settings is give your campaign a name. This is for your organization only and will have no impact on your ads' performance.
In the Networks section, you will be given the option to advertise on other subsidiaries owned by Google. Google offers two extra networks:
We will not select either of these options for this guide.

Right under the Networks section, click on “Show more settings” in order to choose the dates you would like to run your ads. Here, you will be able to decide how long you want your ad to be running for. You will also have the option to select “No end date”, if you don’t know when you want to stop running your ads.

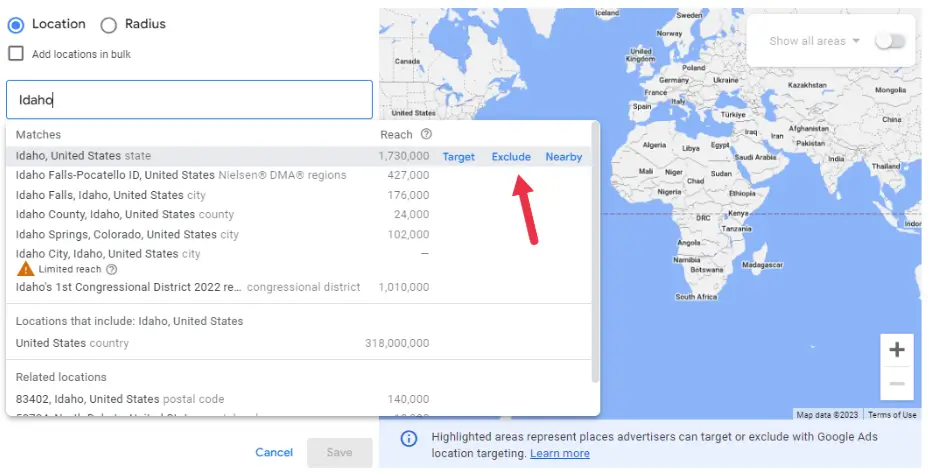
Now you will be able to choose the locations you want your ads to be displayed. There will be a few location suggestions given to you, but you can also add a new one by clicking on “Enter another location.”

If you click on “Advanced search,” next to the text box, you can also choose to exclude locations, in case there is a specific area inside your target location that you don’t want to advertise in.
In this section, you will be able to select the language of the audience you are trying to target. You are welcome to choose more than one language if you believe the location is very culturally diverse.

Google Ads offers audience segments that enable advertisers to target specific demographics, interests, or behaviors. The pros of audience targeting include reaching a more relevant audience and increasing ad effectiveness. However, there are potential cons, such as limiting reach and potentially excluding valuable prospects.

Once you have decided how much you want to spend per month, divide it by the number of days in the month, and set your daily budget. One important thing to know is that Google might exceed your set daily budget on a certain day, but this will be leveled out by Google through a lower spend on other days. For example, if your daily ad spend is $10, Google might spend $15 in a day, but then spend only $5 the next day, so you won’t spend more money than you planned.

When it comes to bidding strategies on Google Ads, advertisers have two options:
You will only use Manual bidding if you check the box saying, “Set a maximum cost per click bid limit,” which we will not be doing in this guide.

When setting up a campaign for the first time, selecting the right keywords is crucial. Keywords are chosen in Google Ads to ensure that ads are displayed to the right audience when relevant Google searches are made.
Here is an example: If you own an ecommerce business that sells clothes, depending on your products, you might want to select keywords like: shirt, dress, jacket, pants, and others. It is usually recommended that you pick from 15 to 25 keywords.
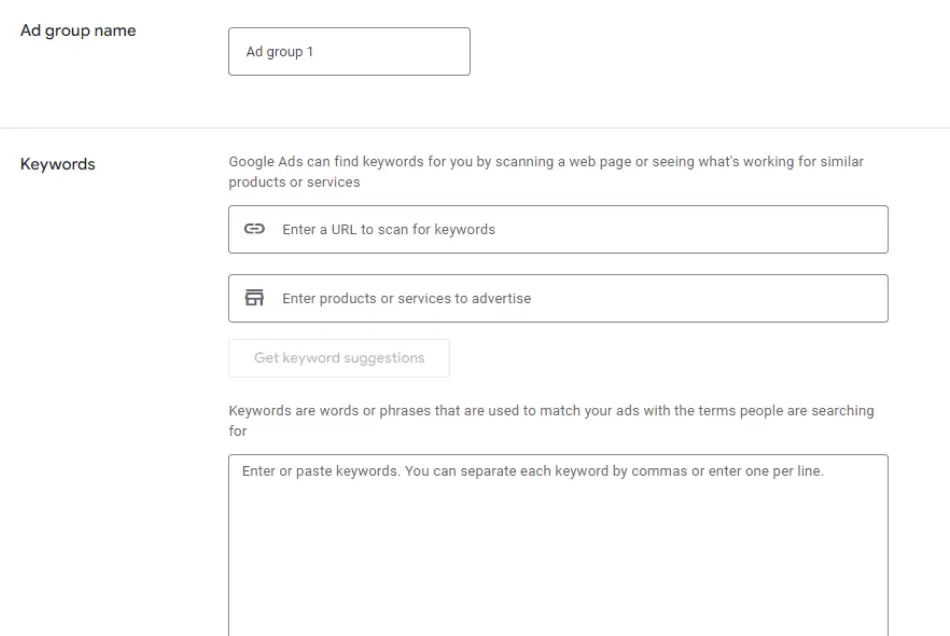
Ad group - Here you will choose a name for your ad group. Similar to the campaign name, this will have no impact on performance, and is simply here to help you keep things organized.
After choosing a name, you will be prompted to choose the keywords. Google will offer you two helpful features for keyword suggestions: the website-based keyword suggestion tool and the product-based keyword suggestion tool.
Website-based keyword - This allows you to input your own website URL or of any competitor, and Google generates keyword suggestions based on the website's content, structure, and themes. This feature takes advantage of the website's existing information to provide relevant keyword ideas.
Product-based keyword - Generates relevant keywords based on your business' product or service. This tool will help you discover specific keywords related to your product, even if you lack a website for the website-based feature.
For a more comprehensive analysis of keyword possibilities, Google's Keyword Planner is an invaluable tool. It empowers advertisers to explore and evaluate keyword ideas based on metrics such as search volume and competition. You will be able to find this tool in the upper right corner, once the set-up process is completed, but here is an image showing where you will be able to find it later.

When selecting the keywords, you will also have the option to choose the match types. Although you can do it in the previous box with all the keywords, there is a more efficient way to do it, which we will be showing in this step. First, however, let’s understand more about what match types are.
Match types in Google Ads determine how keywords are matched to user search queries. They include broad match, phrase match, and exact match. Each match type has a different level of specificity and control over ad triggers.
There is no one-size-fits-all match type in Google Ads. The best match type depends on the specific situation and goals of each advertiser. If your target audience is very small, it might be better to use broad match since there will be fewer people to reach. On the other hand, if your targeted area is very large, phrase match and exact match might be a better choice.
After setting up your account, the best place to change the match types will be in the “Search Keywords” category. By accessing this category, you can view the match type assigned to each keyword and make changes by utilizing the drop-down menu provided.

It is finally time to set up your ad! This is one of the most important steps of the process, and we’ll be extremely detailed to make sure you know what you are doing. As you see in the image below, you will select the final URL, display path, headlines, descriptions, and assets. So let’s get familiar with what these are.
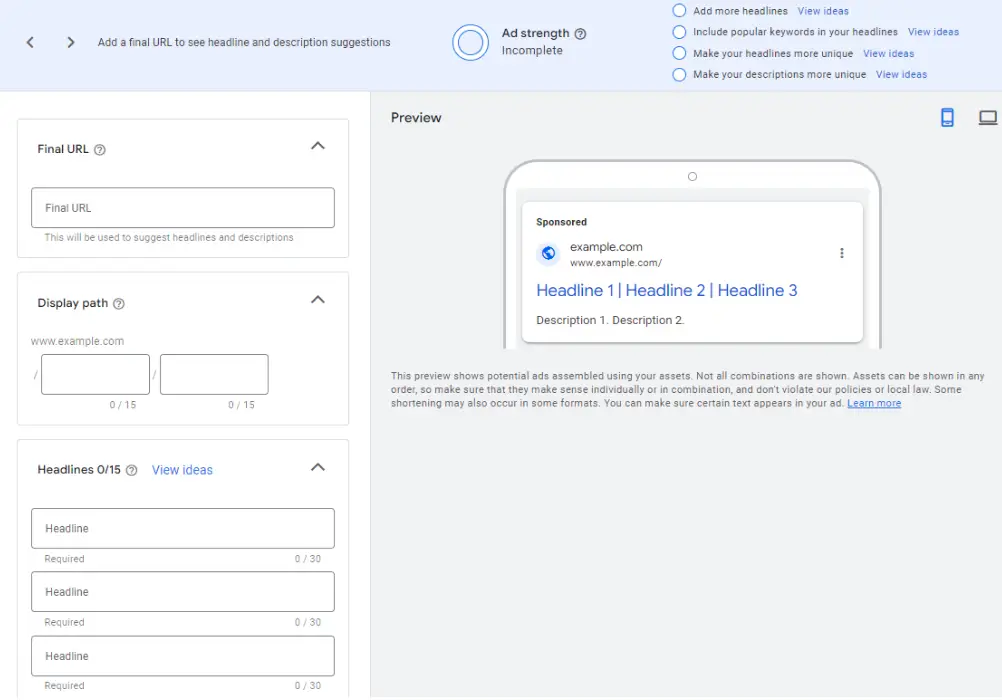
Final URL - This refers to the specific landing page where users will be directed when they click on an ad.
Display path - It allows advertisers to customize the visible part of the ad's URL. It appears below the ad's headline and provides additional information to users about the landing page they will be directed to.
Headlines - This refers to the main lines of text that appear in an advertisement. They serve as the initial point of engagement with users and are designed to capture attention. While you are required to have at least three headlines, you can have up to 15 of them. Since your ad can only fit three headlines at a time, if you provide more, Google will cycle through them and try to find the ones that are performing the best. I would suggest writing 10 to 15 headlines, and if you are not sure about what to write in your headline section, here are a few tips for you
Descriptions - This refers to the additional lines of text that accompany the headlines. They provide an opportunity to provide more information about the product, service, or offer being promoted. You are required to have at least two descriptions, and you can write up to four of them.
Just like we did for the headlines, you should highlight unique selling points, emphasize benefits, and include strong calls to action. Utilize numbers, create urgency, and personalize the message to resonate with your target audience. For example, a fitness app description could be: “Transform your fitness journey with personalized workouts, progress tracking, and a free trial. Start reaching your goals today!”
Assets - Google Ads Assets are not required, but they can expand the functionality and visibility of your ads. These extensions allow you to provide extra information or encourage specific actions from users. Some common types of Google Ads extensions include:
Sitelink Extensions, Call Extensions, and Promotion Extensions.
Here is an image that shows how extensions can look.

Congratulations! Once you have completed these sections, you have performed all the necessary steps to get your ads up and running. Now let me just add one more thing that will help your ads convert even better…
A well-designed landing page is crucial for converting users into customers or leads. It should align with the ad's message and offer a relevant user experience. Here are a few things to keep in mind as you optimize your landing page.
The information provided on this blog is for general informational purposes only, and should not be construed as business, legal, tax, accounting or financial advice. Readers should consult with a qualified professional before making any business, financial, or legal decisions. The views and opinions expressed in this blog are solely those of the authors and do not necessarily reflect the official policy, position, or endorsements of Lendio. While Lendio strives to keep its content current, it is accurate only as of the date posted. Business trends, financial conditions, regulations, and offers are subject to change without notice and may no longer be relevant or available. Lendio expressly disclaims all liability for any reliance placed on this information. By accessing this blog, you acknowledge and agree that Lendio shall not be held liable for any direct, indirect, incidental, consequential, or other damages arising from your use or reliance on the information provided.
Applying is free and won’t impact your credit1.

Before we teach you how to set up Google Ads, let’s familiarize you with a few common terms you will find during this process.
Keywords - These are the words or phrases that people type into Google Search, which trigger your ad to appear. During ad campaign setup, you select keywords matching what users may search for.
Bid - It represents the maximum amount you're willing to pay when someone clicks on your ad. Google Ads only charges for actual clicks, not ad impressions.
Quality Score - It measures the relevance and usefulness of your ad and landing page compared to other advertisers. A higher Quality Score indicates greater relevance to user searches.
CPC (cost-per-click) - It's the actual amount you pay when someone clicks your ad. Your bid sets the maximum cost, but you may pay less for each click.
Conversion - It occurs when a user who clicks your ad completes a desired action, like making a purchase or signing up.
Running successful online advertising campaigns is crucial in today's digital marketing landscape, and Google Ads provides a powerful platform to connect with potential customers at the right moment. Whether you're new to online advertising or an experienced marketer, this guide will equip you with the knowledge and strategies needed to run effective Google Ads campaigns. Now, let's learn how to create ads on Google and increase the potential of your business.
The first step to set up Google Ads will be to create a Google Ads account. You can do it by going to ads.google.com and clicking on the “Start Now” button.
After clicking on the button, you will start the process to set up your Google Ads account, where you will need to provide Google with your business name and your business website.
After completing those two steps, you will be taken to this page where you will select your advertising goal. As you can see, Google tries to simplify your onboarding process by offering four options. Although these options can work well, Google also offers the “Expert Mode” option, where you will have access to different settings that will help you optimize your campaign to take it to the next level. We want to teach you the best way to succeed with Google Ads, so we will be using “Expert Mode” for this guide.
Now it’s time to choose a campaign objective. Google Ads provides you with a range of campaign types to suit different advertising goals and target audiences. The campaign types available in Google Ads include Search, Display, Video, Shopping, App, Discovery, and Local campaigns.
After reading through the descriptions of each objective, you can pick one that fits the goals you have for your business. If you are not sure which campaign objective to select, don’t worry. You can also select the “Create a campaign without a goal's guidance” option, which we are going to use for this guide.
After selecting the campaign objective, you will now be able to choose your campaign type. Google Ads offers many different campaign types, including Search, Performance Max, Display, Video, App, Smart, Discovery, and Shopping.
Each type serves different objectives and audience targeting strategies, allowing advertisers to effectively reach their goals. In this guide, we will be selecting the “Search” type, which is used to create the ads you often see when performing a search on Google. Here is an example of how they look:
After selecting “Search” for our campaign type, Google will want to know what results we are expecting from that campaign. We will choose “Website Visits” for this guide, and then type in the business website one more time.
The first thing you will do in your campaign settings is give your campaign a name. This is for your organization only and will have no impact on your ads' performance.
In the Networks section, you will be given the option to advertise on other subsidiaries owned by Google. Google offers two extra networks:
We will not select either of these options for this guide.
Right under the Networks section, click on “Show more settings” in order to choose the dates you would like to run your ads. Here, you will be able to decide how long you want your ad to be running for. You will also have the option to select “No end date”, if you don’t know when you want to stop running your ads.
Now you will be able to choose the locations you want your ads to be displayed. There will be a few location suggestions given to you, but you can also add a new one by clicking on “Enter another location.”
If you click on “Advanced search,” next to the text box, you can also choose to exclude locations, in case there is a specific area inside your target location that you don’t want to advertise in.
In this section, you will be able to select the language of the audience you are trying to target. You are welcome to choose more than one language if you believe the location is very culturally diverse.
Google Ads offers audience segments that enable advertisers to target specific demographics, interests, or behaviors. The pros of audience targeting include reaching a more relevant audience and increasing ad effectiveness. However, there are potential cons, such as limiting reach and potentially excluding valuable prospects.
Once you have decided how much you want to spend per month, divide it by the number of days in the month, and set your daily budget. One important thing to know is that Google might exceed your set daily budget on a certain day, but this will be leveled out by Google through a lower spend on other days. For example, if your daily ad spend is $10, Google might spend $15 in a day, but then spend only $5 the next day, so you won’t spend more money than you planned.
When it comes to bidding strategies on Google Ads, advertisers have two options:
You will only use Manual bidding if you check the box saying, “Set a maximum cost per click bid limit,” which we will not be doing in this guide.
When setting up a campaign for the first time, selecting the right keywords is crucial. Keywords are chosen in Google Ads to ensure that ads are displayed to the right audience when relevant Google searches are made.
Here is an example: If you own an ecommerce business that sells clothes, depending on your products, you might want to select keywords like: shirt, dress, jacket, pants, and others. It is usually recommended that you pick from 15 to 25 keywords.
Ad group - Here you will choose a name for your ad group. Similar to the campaign name, this will have no impact on performance, and is simply here to help you keep things organized.
After choosing a name, you will be prompted to choose the keywords. Google will offer you two helpful features for keyword suggestions: the website-based keyword suggestion tool and the product-based keyword suggestion tool.
Website-based keyword - This allows you to input your own website URL or of any competitor, and Google generates keyword suggestions based on the website's content, structure, and themes. This feature takes advantage of the website's existing information to provide relevant keyword ideas.
Product-based keyword - Generates relevant keywords based on your business' product or service. This tool will help you discover specific keywords related to your product, even if you lack a website for the website-based feature.
For a more comprehensive analysis of keyword possibilities, Google's Keyword Planner is an invaluable tool. It empowers advertisers to explore and evaluate keyword ideas based on metrics such as search volume and competition. You will be able to find this tool in the upper right corner, once the set-up process is completed, but here is an image showing where you will be able to find it later.
When selecting the keywords, you will also have the option to choose the match types. Although you can do it in the previous box with all the keywords, there is a more efficient way to do it, which we will be showing in this step. First, however, let’s understand more about what match types are.
Match types in Google Ads determine how keywords are matched to user search queries. They include broad match, phrase match, and exact match. Each match type has a different level of specificity and control over ad triggers.
There is no one-size-fits-all match type in Google Ads. The best match type depends on the specific situation and goals of each advertiser. If your target audience is very small, it might be better to use broad match since there will be fewer people to reach. On the other hand, if your targeted area is very large, phrase match and exact match might be a better choice.
After setting up your account, the best place to change the match types will be in the “Search Keywords” category. By accessing this category, you can view the match type assigned to each keyword and make changes by utilizing the drop-down menu provided.
It is finally time to set up your ad! This is one of the most important steps of the process, and we’ll be extremely detailed to make sure you know what you are doing. As you see in the image below, you will select the final URL, display path, headlines, descriptions, and assets. So let’s get familiar with what these are.
Final URL - This refers to the specific landing page where users will be directed when they click on an ad.
Display path - It allows advertisers to customize the visible part of the ad's URL. It appears below the ad's headline and provides additional information to users about the landing page they will be directed to.
Headlines - This refers to the main lines of text that appear in an advertisement. They serve as the initial point of engagement with users and are designed to capture attention. While you are required to have at least three headlines, you can have up to 15 of them. Since your ad can only fit three headlines at a time, if you provide more, Google will cycle through them and try to find the ones that are performing the best. I would suggest writing 10 to 15 headlines, and if you are not sure about what to write in your headline section, here are a few tips for you
Descriptions - This refers to the additional lines of text that accompany the headlines. They provide an opportunity to provide more information about the product, service, or offer being promoted. You are required to have at least two descriptions, and you can write up to four of them.
Just like we did for the headlines, you should highlight unique selling points, emphasize benefits, and include strong calls to action. Utilize numbers, create urgency, and personalize the message to resonate with your target audience. For example, a fitness app description could be: “Transform your fitness journey with personalized workouts, progress tracking, and a free trial. Start reaching your goals today!”
Assets - Google Ads Assets are not required, but they can expand the functionality and visibility of your ads. These extensions allow you to provide extra information or encourage specific actions from users. Some common types of Google Ads extensions include:
Sitelink Extensions, Call Extensions, and Promotion Extensions.
Here is an image that shows how extensions can look.
Congratulations! Once you have completed these sections, you have performed all the necessary steps to get your ads up and running. Now let me just add one more thing that will help your ads convert even better…
A well-designed landing page is crucial for converting users into customers or leads. It should align with the ad's message and offer a relevant user experience. Here are a few things to keep in mind as you optimize your landing page.